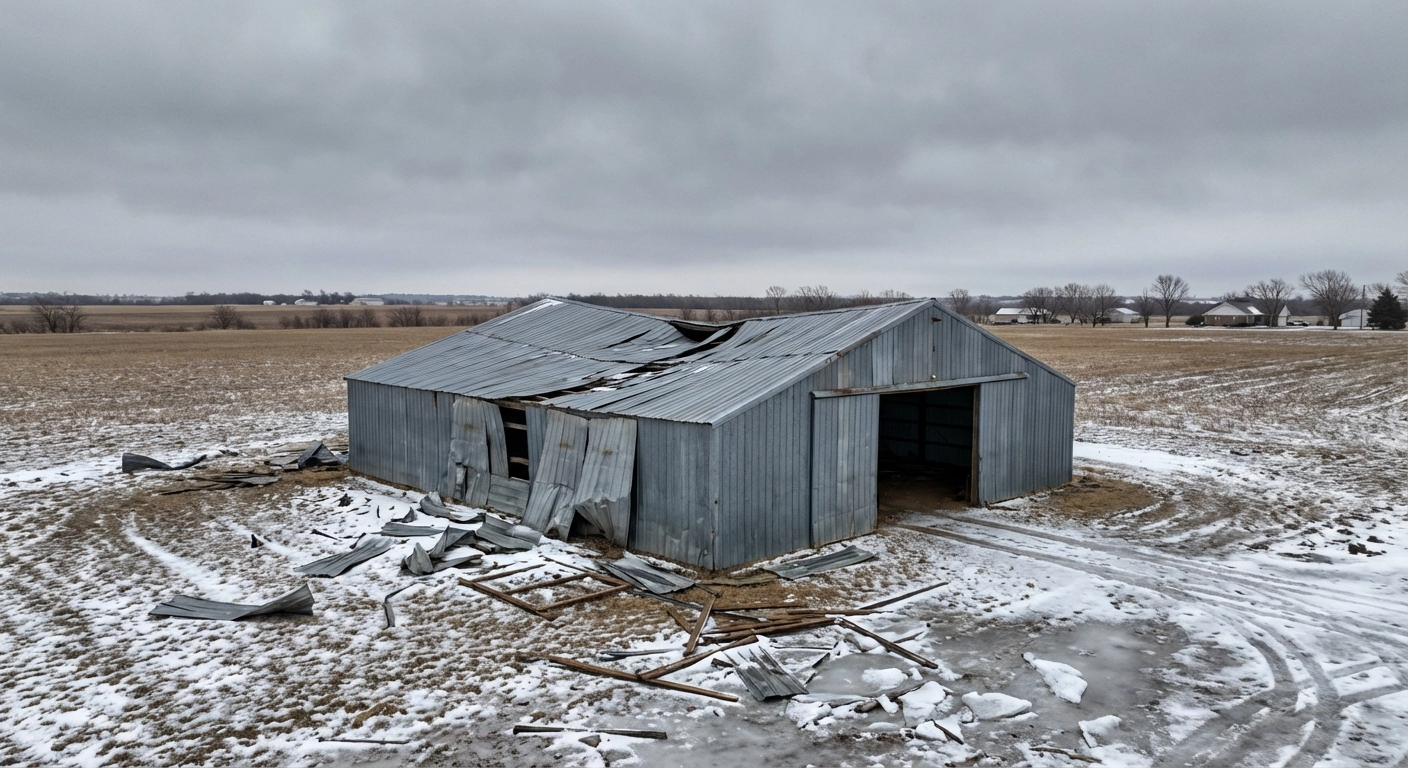
Texas and Oklahoma weather doesn't pull punches. Between severe storms, ice events, and high winds, metal buildings across our region take a beating — and after Winter Storm Fern hit in January 2026, thousands of property owners found themselves facing repairs they hadn't planned for.
Whether your metal roof took hail damage, your barn sagged under ice, or your shop building lost panels in straight-line winds, the decisions you make in the first days and weeks after the damage will determine how much you spend, how long the repair takes, and whether the fix actually holds up.
At Indaco Metals, we've been manufacturing metal building kits and roofing in Texas and Oklahoma since 1995. We've helped property owners through every major storm event over the past three decades. Here are five critical considerations we urge every building owner to work through before picking up a hammer or signing a contract.
This is the most dangerous mistake we see. A metal building can look intact from your truck window and still have serious hidden damage. Steel behaves differently than wood — it doesn't snap or splinter. Instead, it bends, stretches, and buckles in ways that can be difficult to spot but dramatically reduce the structure's ability to carry load.
Before anyone climbs on the roof, do a ground-level visual inspection. Sight down the ridge line — it should be perfectly straight. A dip or "swayback" means the trusses or rafters have permanently deflected. Check the eave line along the gutters for any bowing between columns. Use a level or plumb bob on the corner columns; walls bowing outward at the top is a serious warning sign that the roof structure has flattened and is pushing the walls apart.
Look at the screw lines on your roof and wall panels. Every fastener should sit perpendicular to the panel surface. Tilted screws mean the panels have shifted relative to the purlins underneath. If you see metal torn or slotted around the screw holes, the skin of your building is no longer bracing the frame the way it should.
Inside the building, look for diagonal cracks at the corners of doors and windows (in finished spaces), and try operating every door. A man-door or roll-up that binds or sticks when it worked fine before the storm tells you the frame has moved.
If snow or ice is still on your roof, resist the urge to climb up and shovel. Removing weight from only one side of a compromised structure can create unbalanced loading that twists the building. And the impact of aggressive shoveling can fracture steel members already stressed to their limit. If removal is necessary to prevent collapse, it should be done from a lift, symmetrically, and never by standing on the roof itself.
When in doubt, call a Professional Engineer (PE) before you call a contractor. A PE can assess whether your frame is repairable or whether you're looking at a full replacement.
The natural instinct after storm damage is to start clearing debris and making things safe. But if you clean up before your insurance adjuster sees the damage, you may have just destroyed your own claim.
Many modern insurance policies include a "Cosmetic Damage Exclusion" for metal roofs. This means the insurer won't pay for hail dents or scratches if they decide the damage doesn't affect the roof's ability to shed water. The problem is that a dent near a lap joint or fastener can absolutely break a watertight seal — and hail impacts can cause micro-fractures in the paint system that expose raw steel to corrosion.
Your documentation needs to focus on function, not appearance. Don't just photograph a dent. Photograph the gap the dent created at a seam. Capture close-ups of cracked or crazed paint finish. Photograph any interior water stains that correspond to exterior damage points. You need to build a case that the damage compromises the building's integrity, not just its looks.
Start with wide shots of all four sides of the building for context, then move in close. A macro photo of a bent panel is useless to an adjuster if they can't tell where on the building it's located. For collapsed structures, photograph equipment and contents in place under the debris before moving anything — this proves they were inside at the time of failure.
Keep every receipt for emergency materials like tarps, plywood, and temporary labor. You have a contractual duty to prevent further damage (mitigation), and those costs are almost always reimbursable. But don't perform permanent repairs until the claim is approved. If you fix a wall before the adjuster sees the bent frame behind it, that frame repair likely won't be covered.
Here's one most people miss: repairing a damaged building can trigger a requirement to bring the entire structure up to current building codes. Standard property coverage typically pays for replacement in kind — putting back exactly what was there. It does not pay for upgrades required by newer codes, like heavier steel or updated wind load specs. Check your policy for an "Ordinance or Law" endorsement. If you have it, it can cover those additional costs. If you don't, they'll come out of your pocket.
This is where emotions and economics collide. The building has history, maybe sentimental value, and tearing it down feels wasteful. But repairing a metal building is precision work, and in 2026's high-demand labor market, that precision comes at a premium.
A widely used guideline in the steel industry: if structural damage affects more than 30–40% of the building's footprint, the labor cost to surgically remove and replace bent steel often exceeds the cost of starting fresh with a new kit. Repairing is slower than building new — workers must carefully remove panels (dealing with stripped screws and rust), cut out damaged sections without destabilizing the remaining structure, and fit new square steel into an old frame that may be slightly racked.
In many Oklahoma municipalities, including Shawnee and Sand Springs, if the cost of your repair exceeds 50% of the building's pre-damage market value, you may be required to bring the entire building up to current codes. Updated standards like ASCE 7-22 have increased snow load requirements and changed wind load calculations for our region. Meeting those standards on an older building can mean adding bracing, replacing purlins with heavier gauge steel, or upgrading the foundation — costs that frequently tip the math toward full replacement.
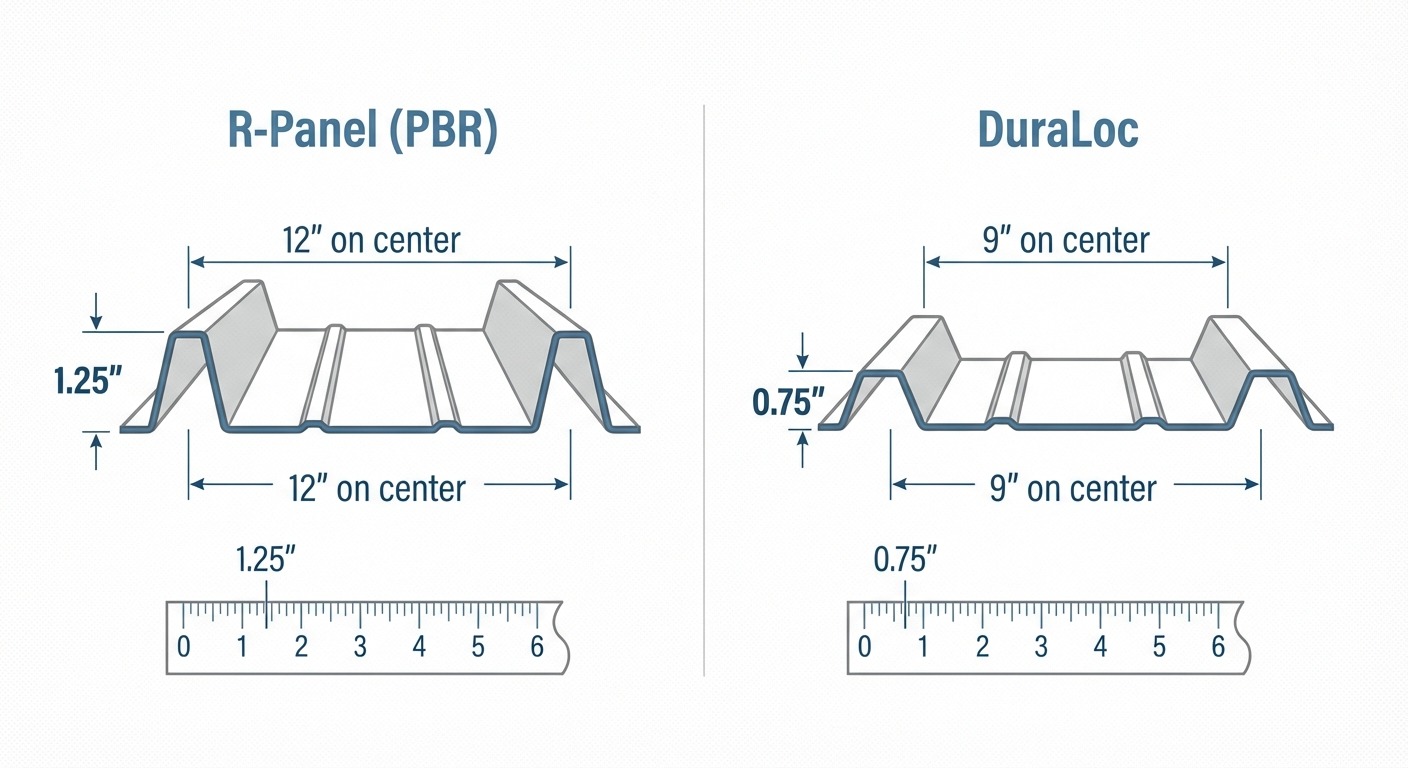
If your building is 15 or 20 years old, the specific roll-form profile used on your panels may no longer be manufactured. Indaco's R-Panel is an industry-standard 1.25" rib profile that's widely compatible. Our DuraLoc panel has a specific 0.75" rib spacing that looks similar to other low-profile panels but may differ by fractions of an inch — and mismatched panels cannot be lapped without leaking.
Before ordering replacement panels, measure the pitch (distance between ribs) precisely. Better yet, bring a physical sample or a detailed photo with a tape measure to our Shawnee or Sand Springs locations and our team will identify your exact profile.
A repair done with the wrong materials can fail faster than the original damage. The most common cause of premature failure in repaired metal buildings isn't the steel itself — it's the incompatibility of the fasteners and components used to fix it.
When two dissimilar metals touch each other in the presence of moisture, the more "noble" metal steals electrons from the less noble one, causing it to corrode rapidly. Oklahoma's humid springs make this a real and common problem.
The classic mistake: using stainless steel screws on Galvalume or galvanized panels. Stainless is far more noble than zinc, so the zinc coating around each screw hole corrodes fast. The hole enlarges, the screw loosens, and you're left with a leaky roof. The fix is simple — use zinc-aluminum headed screws that match the panel's coating. If you must connect dissimilar metals (like mounting an aluminum unit on a steel roof), use a neoprene or EPDM rubber pad to break the electrical connection.
Indaco supplies specific screws for specific jobs, and mixing them up is one of the most common DIY errors.
Structural screws (self-drilling) have a large drill point and fine threads — they attach panels to purlins or framing. Stitch screws have coarse threads and blunt points — they attach panel-to-panel at the side lap by pulling two thin sheets tight together. If you use a structural screw where a stitch screw belongs, the oversized drill point rips a hole too big for the threads to grab. You end up with a stripped fastener and a leak right at the seam.
Washer condition matters too. Old screws almost always have dried, cracked rubber washers. New fasteners must have quality EPDM washers, and installation torque needs to be just right — overtightened washers bulge and split, while loose washers spin freely and let water in.
After major storms, the market floods with contractors looking to cut costs. A common shortcut is substituting 29-gauge steel for the 26-gauge material specified in your building's original design. The thickness difference is hard to detect by feel, but the performance gap is significant. Thinner steel means lower wind ratings, less hail resistance, and weaker diaphragm action. Indaco Metals builds its kits with 26-gauge steel for a reason. If you're hiring a contractor, demand to see the mill markings or the Indaco invoice to verify you're getting what you paid for.
The last consideration is strategic. If you're already tearing into the building, this is your opportunity to upgrade rather than simply reset the clock to the same vulnerability that failed in the first place.
If your building failed under snow or ice load, the roof structure was likely under-designed for that extreme event. When rebuilding, consider reducing truss or purlin spacing — going from 10-foot spacing to 8 or even 5 feet dramatically increases load capacity. If you're replacing the roof structure entirely, a steeper pitch (4:12 or 5:12 instead of the standard 3:12) helps the roof shed snow and ice faster, reducing the total weight the structure has to carry.
During a repair, you'll likely expose the insulation. Metal buildings are prone to interior condensation ("sweating"), and if the vapor barrier was torn during the storm or the repair process, moist air will contact cold steel and create interior dripping. This is the perfect time to upgrade from old vinyl-back fiberglass to a modern reinforced insulation system. Closed-cell spray foam is worth considering — it adheres directly to the metal, acts as a perfect vapor barrier, and actually adds structural rigidity to the panels.
For a deeper look at insulation options, check out our guide on methods for insulating metal buildings.
After a major weather event, supply chains get stretched thin. Sourcing panels from a national distributor can mean weeks of delays waiting for a truck from out of state. Indaco Metals manufactures panels and building kits right here in Oklahoma — at our facilities in Shawnee and Sand Springs. We cut panels to the inch, which eliminates end-laps (horizontal seams that are the most common leak point in any metal roof). A continuous panel from ridge to eave is easier to install and functionally superior.
Whether you're dealing with storm damage, age-related wear, or just want a professional opinion on your building's condition, our team has three decades of Oklahoma metal building experience to draw on. We can help you identify your existing panel profile, source the right materials, and connect you with qualified local contractors.
Give us a call or stop by either location — Monday through Friday, 8 am to 5 pm.
Shawnee: 3 American Way, Shawnee, OK 74804 — (405) 273-9200
Sand Springs: 17427 W 9th St, Sand Springs, OK 74063 — (918) 419-6053
Or contact our sales team online to get started. When it comes to repairing your metal building, getting it right the first time saves you from paying for it twice.
Complete this short form, or give us a call anytime: